

The Ghost Mannequin effect gives your shoppers a much better sense of the fit and looks of a garment without the need for expensive models, resulting in more online sales at lower costs.
The Ghost Mannequin or Invisible mannequin effect is a powerful post-production technique that does wonders for fashion eCommerce success. Combining several shots of a garment in a specific way creates the illusion that a “ghost” is wearing it. It brings the garment to life without the distraction of a model, providing your shoppers with a great shopping experience as it gives a much better sense of your products’ fit, shape, and looks.
Adding that ‘three-dimensional look’ usually only works when using real models. But if your budget or available time is tight, or the model is simply unavailable, opting for the Ghost Mannequin effect is wise, as it will boost your conversion rates compared to on-hanger or simple laydown photography.
On top of that, we will show you extra possibilities to increase that success even further, using Ghost Mannequin imagery as a foundation.
What we will cover in this article:
- What the Ghost Mannequin effect exactly is
- Simple steps to create the basic images needed for the Ghost Mannequin effect
- How you can use the Ghost Mannequin to boost eCommerce success (in a way that might surprise you)
What is the Ghost Mannequin effect exactly?
The ghost mannequin effect aims to create a lifelike image that focuses on your product. It is a post-production process in which you combine several images shot on a mannequin or model to make it look like an invisible person or ghost is wearing the garment. To make it look realistic, you need several shots of the garment combined in post-production. For most garments, one image of the garment on a mannequin and one of the inner back is sufficient to create a perfect Ghost Mannequin shot.
Before the idea originated, (r)e-tailers presented clothing in one of four ways:
- On a real-life model
- On a mannequin/dummy
- On a hanger
- As a laydown or table shot
Each way has its pros and cons. For example, using real models is not only expensive but requires a lot of time and resources. In addition, the model needs to change into each specific item requiring hair and make-up artists to be present and a stylist to ensure the clothes are presented correctly.
Opting for a hanger or a laydown shot eliminates most of those problems but doesn’t do the products’ fit and shape any justice. Both ways are much cheaper and faster than on-model photography, but it is tough to get a clear sense of a garment’s fit and look if it is not presented on a human figure.
So that leaves shooting on a mannequin/dummy. It shows the product more three-dimensionally, similar to the on-model shot. But a dummy is not very esthetically pleasing to look at, more so if it is used repeatedly. You don’t want your clients focussing on some plastic figurine, taking away attention from the product itself. Applying the Ghost Mannequin effect removes the dummy from the image, leaving the fit, cut, and look intact.
To make it look realistic, you need several shots of the garment combined in post-production. A photo of the garment on the dummy and one of the inner back are sufficient to create a perfect Ghost Mannequin shot for most garments.
Simple steps to create the basic images needed for the Ghost Mannequin effect
Depending on your current studio set-up, creating the ingredients for the perfect Ghost Mannequin shot is not too hard. If you are used to shooting in a studio, you only need a few tweaks in your workflow. If you are starting from scratch, it might take a bit longer but with these steps getting started should be a bit easier.
Step 1. Select the correct type of mannequin
The best way to shoot the basic images needed for the Ghost mannequin effect is to shoot it on a high-quality mannequin. This ensures consistency in your shots and makes it much easier and faster to create all required images.
You want to go with a basic straight and upright torso. Also, make sure you get one with detachable arms for faster dressing. Finally, depending on your budget, you can choose a Mannequin with detachable necklines, creating the effect much more effortless.
A white matte finish is recommended as they tend to be non-reflective. This makes it easier to edit later on, especially if you use a white backdrop so the mannequin and the background blend together.
A best practice is to stick with the same sized garments as much as possible, matching the size and fit of your mannequin. Too big or too small leads to a bad looking end result.
Step 2 – Set up your studio
There are excellent tutorials out there to help you with your photography set up but make sure you take care of the basics:
- Good consistent lighting
- An evenly white background
- A high-res camera mounted on a tripod
- A fixed spot for your mannequin, at least 5 feet from the backdrop
- A big foam board for shooting the inside of the products
Shooting the products
Consistency is key here. The lighting should be the same for each shot. The same goes for the angle and distance of the camera. Slight variations in either of these can lead to unnatural-looking results. Work with markers for the camera and the mannequin, so you are confident these parameters are always the same, even when your shoot is spread over multiple days.
Spend some time styling the product after you dress the mannequin. Using a clip on the back can help you optimize the product fit. Of course, you can fix much while editing your images, but avoiding big creases, folds and stains speeds up the overall process.
A common mistake to avoid when shooting products with sleeves is positioning your product so that you can see down the sleeves. Instead, let them drape naturally to the side as much as possible.
When shooting tops, position the camera at chest height for best results. Hip height is recommended for bottoms.
For perfect ghost mannequin shots, you need to
- Shoot both the front and back of the product on the mannequin
- And for the inside view, also an image of the front and the back on the foam board
These shots are combined into one image in the editing stage to create the Ghost Mannequin effect. Sometimes, turning the product inside out and reshooting it can be handy. This works incredibly well for collared items. When shooting, ensure the collar is opened up far enough to see the inside clearly.
Preparing the images for the editing process.
A good habit to develop is to devise a consistent way of naming your files so that you can recognize and group them more easily. Whatever system works for you is fine, but if you outsource the image editing, logical file names make the process much more efficient.
You will want to create a front and back shot of the Invisible mannequin, so group your images accordingly.
Now that you have all the shots you need, you have everything to create perfect Ghost Mannequin imagery for your products. At this point, you have to decide to either do the editing yourself or outsource the work to an image editing company. There are many to choose from but not all deliver the same results.
We have been creating Ghost Mannequins since 2007. Getting started is easy. Create a free account in STREAM, our online application, and you can start uploading your images instantly. Within 24 hours, your Ghost mannequin images are ready to publish online.
How you can use the Ghost Mannequin effect to boost your eCommerce success
As we mentioned, Ghost Mannequin imagery is a popular and cost-effective way to present your clothing online—a much better alternative than laydown photography or shooting it on a hanger. And even though it takes a bit more preparation time, the result will significantly boost your conversion rate.
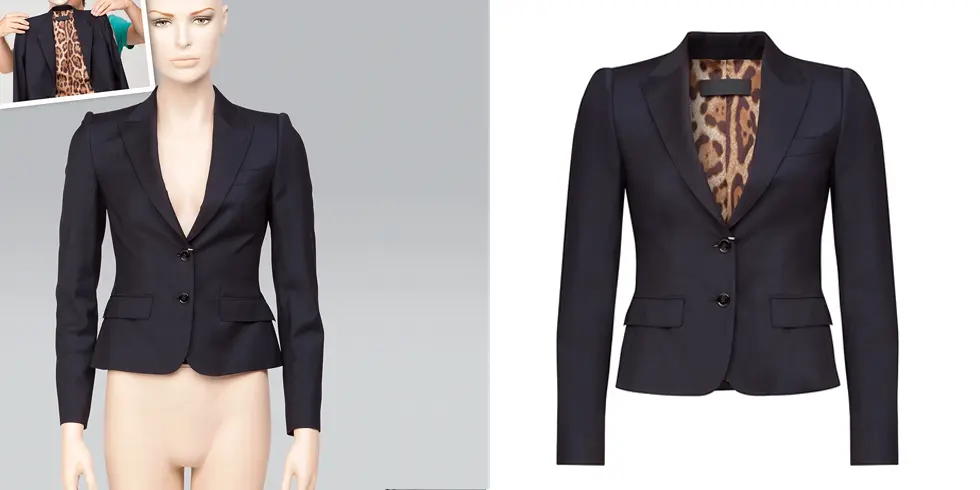
But that is not the only way Ghost Mannequin can help you increase sales. As we saw earlier, presenting your garments on a model is the best way to help your customers make well-informed buying decisions. But then you must worry about booking the models and hiring stylists and make-up artists. This can seriously decrease your studio output and take a big chunk out of your budget. Fortunately, you can now use your Ghost Mannequin shots to create on-model images without the need for live models with POS3D.
Since you already have the Ghost mannequin, you can now show a complete range of shots – even including detail shots – in your online shop, giving your customers all the information they need to add the item to their cart, all from the same Ghost Mannequin image.
How does POS3D work?
The idea for POS3D is simple but powerful. We combine an existing basic model shot with either the finished Ghost Mannequin shot or the image you shot on the mannequin. The result is a beautiful on-model shot without the time-consuming real model photoshoot.
Perfect for all wearables
POS3D makes it possible to transform standard product shots into on-model images. Perfect for all wearables like jewelry, accessories, eyewear, and even footwear. All you need is a basic model and a high-quality product shot. Then, within 24 hours, your on-model images are online, ready to increase your conversion rates.
Make your post-production more cost effective
Download our 6-step guide for FREE and learn how to:
Get your content in sync with your multi-channel strategy
Always stay in control of your output
Enable your stylists to create more images per set
And much more…